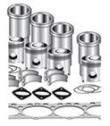
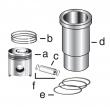
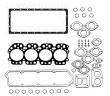
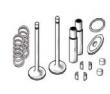
约翰迪尔 4045 4.5T/H 活塞(米) RE507758 排放 2 & 3
|
|
|
发动机和设备型号
|
孔径:
4.19 in 106.5 mm
销径 Ø:
1.6250 in (+/- .0002) = 41mm
JOHN DEERE
4045HF475
|
|
|
强鹿JOHN DEERE柴油机配件、发动机配件、发电机组:
4039DF004、6068HF252、4039DF005、4039DF008、6076TF010、6059TF001、4045HF275、RG6125、6135H458、4045DFM70, 4045TFM75, 6068TFM75, 6068TFM76、6068HF275、6125HF070\6125AF001,4039DFM、6125HF070、6135HF475-2、6135HF475-3 RW9400T、3029DF120、RG6081、TO4039、TO6068、6135SM75、6135HF485、4045HF275、RG6125、6135H458、4045DFM70, 4045TFM75, 6068TFM75, 6068TFM76、6068HF275、4039DFM/
强鹿JOHN DEERE柴油机配件、发动机配件、发电机组:
RE515368、RE62420、RE65414(24V)、RE500227、SE501836、SE501828、SE501823、RE533516、RE525690、RE16809、RE16808、RE509672、RE525523、RE523236、RE525523、RE62424、RE504564、RE160384、RE557343、RE533910、RE532952、RE530107、RE531808、RE507981、RE532627、RE518176、RE532628、RE519774、RE533608、RE522528、RE519774、RE532628、 RE518176、RE507980、RE518503、RE522515、RE504836、RE509031、RE509032/9995-16 powertech 12.5l 6125hf070 engine (waterloo) (esn 030000- ) pc2875 (17-dec-02) pn=672 p r o o f p r o o f powertech 12.5l 6125hf070 engine (waterloo) (esn 030000- ) numerical index - continued part no. grid key page part no. grid key page part no. grid key page r504677 17 2300 - 2303b r505747 16 1600a - 1615 r56461 2 1600 - 1639 r504677 17 2300 - 2305b r505747 16 1600a - 1617 r56461 2 1600 - 1641 r504677 17 2300 - 2339 r505747 16 1600a - 1619 r56461 2 1600 - 1643 r504677 17 2300 - 2341 r505747 16 1600a - 1621 r56461 2 1600 - 1645 r504713 7 5100 - 5103 r505747 16 1600a - 1623 r56461 2 1600 - 1647 r504731 5 7400 - 7410 r505747 16 1600a - 1625 r56461 2 1600 - 1649 r504735 9 1900 - 1903 r505747 16 1600a - 1627 r56461 2 1600 - 1651 r505450 7 1100 - 1101 r505747 16 1600a - 1629 r56461 2 1600 - 1653 r505512 11 9700 - 9711 r505747 16 1600a - 1631 r56461 2 1600 - 1655 r505747 16 1600 - 1601b r505747 16 1600a - 1633 r56461 2 1600 - 1657 r505747 16 1600 - 1601d r50659 2 3100 - 3105 r56461 2 1600 - 1659 r505747 16 1600 - 1601f r51133 13 3900 - 3903 r56461 2 1600 - 1661 r505747 16 1600 - 1601h r51133 13 4600 - 4603 r56461 2 1600 - 1663 r505747 16 1600 - 1603 r515283 6 3000 - 3011 r56461 2 1600 - 1665 r505747 16 1600 - 1605 r515283 6 3000 - 3013 r56461 2 1600 - 1667 r505747 16 1600 - 1607 r51530 16 3100 - 3105 r56461 2 1600 - 1669 r505747 16 1600 - 1609 r51535 31 3100 - 3105 r56461 2 1600 - 1671 r505747 16 1600 - 1611 r51649 7 3100 - 3105 r56461 2 1600 - 1673 r505747 16 1600 - 1613 r53307 14 9700 - 9717 r56461 2 1600 - 1675 r505747 16 1600 - 1615 r53307 14 9700 - 9719 r56461 2 1600 - 1677 r505747 16 1600 - 1617 r53308 9 9700 - 9717 r56461 2 1600 - 1679 r505747 16 1600 - 1619 r53308 9 9700 - 9719 r56461 2 1600 - 1681 r505747 16 1600 - 1621 r53309 1 9700 - 9717 r56461 2 1600 - 1683 r505747 16 1600 - 1623 r53309 1 9700 - 9719 r56461 2 1600 - 1685 r505747 16 1600 - 1625 r53311 4 9700 - 9717 r56461 2 1600 - 1687 r505747 16 1600 - 1627 r53311 4 9700 - 9719 r56461 2 1600 - 1689 r505747 16 1600 - 1629 r53339 24 9700 - 9717 r56461 2 1600 - 1691 r505747 16 1600 - 1631 r53339 24 9700 - 9719 r56461 2 1600 - 1693 r505747 16 1600 - 1633 r53342 7 9700 - 9717 r56461 2 1600 - 1695 r505747 16 1600 - 1635 r53343 8 9700 - 9717 r56461 2 1600 - 1697 r505747 16 1600 - 1637 r53343 8 9700 - 9719 r56461 2 1600a - 1603 r505747 16 1600 - 1639 r53348 7 9700 - 9719 r56461 2 1600a - 1605 r505747 16 1600 - 1641 r53811 14 7800 - 7807 r56461 2 1600a - 1607 r505747 16 1600 - 1643 r53811 1 9700 - 9713 r56461 2 1600a - 1609 r505747 16 1600 - 1645 r53955 11 9700 - 9728 r56461 2 1600a - 1611 r505747 16 1600 - 1647 r53955 11 9700 - 9729 r56461 2 1600a - 1613 r505747 16 1600 - 1649 r55233 4 3900 - 3903 r56461 2 1600a - 1615 r505747 16 1600 - 1651 r55233 7 5900 - 5903 r56461 2 1600a - 1617 r505747 16 1600 - 1653 r55233 11 5900 - 5903 r56461 2 1600a - 1619 r505747 16 1600 - 1655 r55233 24 5900 - 5905 r56461 2 1600a - 1621 r505747 16 1600 - 1657 r55233 28 5900 - 5905 r56461 2 1600a - 1623 r505747 16 1600 - 1659 r55233 7 5900 - 5907 r56461 2 1600a - 1625 r505747 16 1600 - 1661 r55233 31 5900 - 5907 r56461 2 1600a - 1627 r505747 16 1600 - 1663 r56192 10 5200 - 5205 r56461 2 1600a - 1629 r505747 16 1600 - 1665 r56192 10 9700 - 9707 r56461 2 1600a - 1631 r505747 16 1600 - 1667 r56461 2 1600 - 1601b r56461 2 1600a - 1633 r505747 16 1600 - 1669 r56461 2 1600 - 1601d r56461 4 9900 - 9909 r505747 16 1600 - 1671 r56461 2 1600 - 1601f r56461 9900 - 9909 r505747 16 1600 - 1673 r56461 2 1600 - 1601h r56464 7 3900 - 3903 r505747 16 1600 - 1675 r56461 2 1600 - 1603 r56464 35 9900 - 9909 r505747 16 1600 - 1677 r56461 2 1600 - 1605 r56751 7 1900 - 1903 r505747 16 1600 - 1679 r56461 2 1600 - 1607 r56751 11 1900 - 1905 r505747 16 1600 - 1681 r56461 2 1600 - 1609 r56751 7 1900 - 1907 r505747 16 1600 - 1683 r56461 2 1600 - 1611 r56751 25 9900 - 9909 r505747 16 1600 - 1685 r56461 2 1600 - 1613 r56757 5 2000 - 2003 r505747 16 1600 - 1687 r56461 2 1600 - 1615 r56757 7 2000 - 2005 r505747 16 1600 - 1689 r56461 2 1600 - 1617 r56757 23 9900 - 9909 r505747 16 1600 - 1691 r56461 2 1600 - 1619 r56902 6 9700 - 9721 r505747 16 1600 - 1693 r56461 2 1600 - 1621 r56902 7 9700 - 9723 r505747 16 1600 - 1695 r56461 2 1600 - 1623 r57503 8 2000 - 2003 r505747 16 1600 - 1697 r56461 2 1600 - 1625 r57503 8 3900 - 3903 r505747 16 1600a - 1603 r56461 2 1600 - 1627 r59873 15 7800 - 7803 r505747 16 1600a - 1605 r56461 2 1600 - 1629 r59873 15 7800 - 7805 r505747 16 1600a - 1607 r56461 2 1600 - 1631 r59873 13 9700 - 9713 r505747 16 1600a - 1609 r56461 2 1600 - 1633 r60756 4 4400 - 4403 r505747 16 1600a - 1611 r56461 2 1600 - 1635 r62191 5 2300 - 2303 r505747 16 1600a - 1613 r56461 2 1600 - 1637 r62191 6 2300 - 2303b powertech 12.5l 6125hf070 engine (waterloo) (esn 030000- ) pc2875 (17-dec-02) 9995-17 pn=673 p r o o f p r o o f powertech 12.5l 6125hf070 engine (waterloo) (esn 030000- ) numerical index - continued part no. grid key page part no. grid key page part no. grid key page r62191 10 2300 - 2303d r62192 6 2300 - 2343 r62194 6 2300 - 2333 r62191 5 2300 - 2305 r62192 6 2300 - 2345 r62194 10 2300 - 2333b r62191 6 2300 - 2305b r62192 6 2300 - 2347 r62194 5 2300 - 2333d r62191 10 2300 - 2305d r62192 6 2300 - 2349 r62194 6 2300 - 2335 r62191 5 2300 - 2307 r62192 6 2300 - 2351 r62194 5 2300 - 2335b r62191 5 2300 - 2309 r62193 5 2300 - 黄冈JohnDeereRE60005气门弹簧座公司,秦皇岛约翰迪尔柴油发电机组活塞环价格行情,新疆强鹿柴油发动机曲轴诚信推荐,漳州约翰迪尔联合收割机发动机发电机厂家价格,吴忠强鹿原装进口汽缸垫哪家买,汕头约翰迪尔R106831进气门导管供应商,防城港强鹿JohndeerePE4045缸套供货商,玉溪约翰迪尔6068四配套厂家价格,盘锦约翰迪尔RE27368主轴瓦的价格,绥化强鹿连杆铜套R114082哪家买,武威强鹿发动机RE55343凸轮轴衬套供应商,长春约翰迪尔柴油发电机组气缸垫厂家批发,漯河约翰迪尔6J-2104拖拉机发动机配件供货商,昭通johndeere约翰迪尔强鹿水泵总成找哪家,毕节约翰迪尔4045柴油机温度传感器厂家供应,怀化约翰迪尔6068柴油机进气门厂家供应,厦门强鹿连杆螺丝R501035哪家好,2303 r62194 6 2300 - 2339 r62191 5 2300 - 2311 r62193 6 2300 - 2303b r62194 6 2300 - 2341 r62191 5 2300 - 2313 r62193 10 2300 - 2303d r62194 6 2300 - 2343 r62191 5 2300 - 2315 r62193 5 2300 - 2305 r62194 6 2300 - 2345 r62191 5 2300 - 2317 r62193 6 2300 - 2305b r62194 6 2300 - 2347 r62191 5 2300 - 2319 r62193 10 2300 - 2305d r62194 6 2300 - 2349 r62191 5 2300 - 2321 r62193 5 2300 - 2307 r62194 6 2300 - 2351 r62191 5 2300 - 2323 r62193 5 2300 - 2309 r62673 3 3000 - 3005 r62191 5 2300 - 2325 r62193 5 2300 - 2311 r62673 3 3000 - 3009 r62191 5 2300 - 2325b r62193 5 2300 - 2313 r62976 2 5100 - 5104 r62191 6 2300 - 2327 r62193 5 2300 - 2315 r62976 17 9900 - 9909 r62191 5 2300 - 2327b r62193 5 2300 - 2317 r63185 8 1100 - 1101 r62191 5 2300 - 2327d r62193 5 2300 - 2319 r63185 2 9900 - 9909 r62191 6 2300 - 2329 r62193 5 2300 - 2321 r63532 23 5900 - 5903 r62191 5 2300 - 2329b r62193 5 2300 - 2323 r63532 36 5900 - 5905 r62191 5 2300 - 2329d r62193 5 2300 - 2325 r63532 38 5900 - 5907 r62191 6 2300 - 2331 r62193 5 2300 - 2325b r63548 8 4600 - 4603 r62191 5 2300 - 2331b r62193 6 2300 - 2327 r63548 29 9900 - 9909 r62191 6 2300 - 2333 r62193 5 2300 - 2327b r63846 7 5200 - 5203 r62191 10 2300 - 2333b r62193 5 2300 - 2327d r63846 1 5200 - 5205 r62191 5 2300 - 2333d r62193 6 2300 - 2329 r63846 1 5200 - 5207 r62191 6 2300 - 2335 r62193 5 2300 - 2329b r63846 1 5200 - 5209 r62191 5 2300 - 2335b r62193 5 2300 - 2329d r63846 7 9700 - 9703 r62191 6 2300 - 2339 r62193 6 2300 - 2331 r63846 1 9700 - 9705 r62191 6 2300 - 2341 r62193 5 2300 - 2331b r63846 1 9700 - 9707 r62191 6 2300 - 2343 r62193 6 2300 - 2333 r63960 4 4800 - 4803 r62191 6 2300 - 2345 r62193 10 2300 - 2333b r63987 3 2300 - 2303 r62191 6 2300 - 2347 r62193 5 2300 - 2333d r63987 4 2300 - 2303b r62191 6 2300 - 2349 r62193 6 2300 - 2335 r63987 8 2300 - 2303d r62191 6 2300 - 2351 r62193 5 2300 - 2335b r63987 3 2300 - 2305 r62192 5 2300 - 2303 r62193 6 2300 - 2339 r63987 4 2300 - 2305b r62192 6 2300 - 2303b r62193 6 2300 - 2341 r63987 8 2300 - 2305d r62192 10 2300 - 2303d r62193 6 2300 - 2343 r63987 3 2300 - 2307 r62192 5 2300 - 2305 r62193 6 2300 - 2345 r63987 3 2300 - 2309 r62192 6 2300 - 2305b r62193 6 2300 - 2347 r63987 3 2300 - 2311 r62192 10 2300 - 2305d r62193 6 2300 - 2349 r63987 3 2300 - 2313 r62192 5 2300 - 2307 r62193 6 2300 - 2351 r63987 3 2300 - 2315 r62192 5 2300 - 2309 r62194 5 2300 - 2303 r63987 3 2300 - 2317 r62192 5 2300 - 2311 r62194 6 2300 - 2303b r63987 3 2300 - 2319 r62192 5 2300 - 2313 r62194 10 2300 - 2303d r63987 3 2300 - 2321 r62192 5 2300 - 2315 r62194 5 2300 - 2305 r63987 3 2300 - 2323 r62192 5 2300 - 2317 r62194 6 2300 - 2305b r63987 3 2300 - 2325 r62192 5 2300 - 2319 r62194 10 2300 - 2305d r63987 3 2300 - 2325b r62192 5 2300 - 2321 r62194 5 2300 - 2307 r63987 4 2300 - 2327 r62192 5 2300 - 2323 r62194 5 2300 - 2309 r63987 3 2300 - 2327b r62192 5 2300 - 2325 r62194 5 2300 - 2311 r63987 3 2300 - 2327d r62192 5 2300 - 2325b r62194 5 2300 - 2313 r63987 4 2300 - 2329 r62192 6 2300 - 2327 r62194 5 2300 - 2315 r63987 3 2300 - 2329b r62192 5 2300 - 2327b r62194 5 2300 - 2317 r63987 3 2300 - 2329d r62192 5 2300 - 2327d r62194 5 2300 - 2319 r63987 4 2300 - 2331 r62192 6 2300 - 2329 r62194 5 2300 - 2321 r63987 3 2300 - 2331b r62192 5 2300 - 2329b r62194 5 2300 - 2323 r63987 4 2300 - 2333 r62192 5 2300 - 2329d r62194 5 2300 - 2325 r63987 8 2300 - 2333b r62192 6 2300 - 2331 r62194 5 2300 - 2325b r63987 3 2300 - 2333d r62192 5 2300 - 2331b r62194 6 2300 - 2327 r63987 4 2300 - 2335 r62192 6 2300 - 2333 r62194 5 2300 - 2327b r63987 3 2300 - 2335b r62192 10 2300 - 2333b r62194 5 2300 - 2327d r63987 4 2300 - 2339 r62192 5 2300 - 2333d r62194 6 2300 - 2329 r63987 4 2300 - 2341 r62192 6 2300 - 2335 r62194 5 2300 - 2329b r63987 4 2300 - 2343 r62192 5 2300 - 2335b r62194 5 2300 - 2329d r63987 4 2300 - 2345 r62192 6 2300 - 2339 r62194 6 2300 - 2331 r63987 4 2300 - 2347 r62192 6 2300 - 2341 r62194 5 2300 - 2331b r63987 4 2300 - 2349 9995-18 powertech 12.5l 6125hf070 engine (waterloo) (esn 030000- ) pc2875 (17-dec-02) pn=674 p r o o f p r o o f powertech 12.5l 6125hf070 engine (waterloo) (esn 030000- ) numerical index - continued part no. grid key page part no. grid key page part no. grid key page r63987 4 2300 - 2351 r72328 6 6500 - 6510 r82459 19 9900 - 9909 r64451 2 4800 - 4803 r72328 1 9900 - 9909 r85144 6 5200 - 5207 r65595 9 9900 - 9922 r72659 9 9600 - 9603 r85144 6 5200 - 5209 r65955 46 9700 - 9717 r72659 11 9600 - 9603 r85144 6 9700 - 9705 r65955 45 9700 - 9719 r72659 9 9600 - 9605 r85145 16 5200 - 5207 r65956 43 9700 - 9717 r72659 11 9600 - 9605 r85145 16 9700 - 9705 r65956 43 9700 - 9719 r72659 9 9600 - 9607 r86007 1 2100 - 2103 r65957 41 9700 - 9717 r72659 11 9600 - 9607 r86007 2 2100 - 2103 r65957 41 9700 - 9719 r72659 9 9600 - 9609 r86007 3 2100 - 2103 r65958 56 9700 - 9717 r72659 11 9600 - 9609 r89349 3 2100 - 2102 r65958 56 9700 - 9719 r72659 9 9600 - 9611 r89439 1 2100 - 2102 r65959 55 9700 - 9717 r72659 11 9600 - 9611 r89439 2 2100 - 2102 r65959 55 9700 - 9719 r72659 9 9600 - 9613 r89439 4 2100 - 2102 r65960 53 9700 - 9717 r72659 11 9600 - 9613 r89439 5 2100 - 2102 r65960 53 9700 - 9719 r72853 4 1700 - 1701 r91889 1 5100 - 5103 r65961 21 9700 - 9717 r72853 4 1700 - 1702 r96515 16 5200 - 5205 r65961 21 9700 - 9719 r72853 31 3500 - 3503 r96515 10 5200 - 5207 r65962 39 9700 - 9719 r72853 7400 - 7401 r96515 10 5200 - 5209 r65963 35 9700 - 9717 r72853 7400 - 7403 r96515 10 9700 - 9705 r65963 35 9700 - 9719 r72853 7400 - 7409 r96515 16 9700 - 9707 r65964 38 9700 - 9717 r75562 4 7800 - 7803 r96934 9 5200 - 5205 r65964 38 9700 - 9719 r75562 12 7800 - 7803 r96934 12 9700 - 9707 r65965 34 9700 - 9717 r75562 4 7800 - 7805 r96935 15 5200 - 5207 r65965 34 9700 - 9719 r75562 12 7800 - 7805 r96935 15 9700 - 9705 r65966 40 9700 - 9717 r75562 5 7800 - 7809 r97097 31 9700 - 9721 r65966 40 9700 - 9719 r75562 5 7800 - 7811 r98064 15 5900 - 5903 r65967 51 9700 - 9717 r75562 4 9700 - 9713 r98064 11 5900 - 5905 r65967 51 9700 - 9719 r75562 11 9700 - 9713 r98064 19 5900 - 5907 r65968 20 9700 - 9717 r78047 3 9900 - 9917 r99590 13 2300 - 2303 r65968 20 9700 - 9719 r78048 10 9900 - 9917 r99590 10 2300 - 2303b r65970 57 9700 - 9717 r78049 15 9900 - 9917 r99590 21 2300 - 2303d r65970 57 9700 - 9719 r78050 19 9900 - 9917 r99590 13 2300 - 2305 r65971 58 9700 - 9717 r78051 24 9900 - 9917 r99590 10 2300 - 2305b r65971 58 9700 - 9719 r78052 5 9900 - 9917 r99590 21 2300 - 2305d r65972 44 9700 - 9717 r78053 13 9900 - 9917 r99590 13 2300 - 2307 r65972 44 9700 - 9719 r78054 17 9900 - 9917 r99590 13 2300 - 2309 r65973 32 9700 - 9717 r78055 22 9900 - 9917 r99590 13 2300 - 2311 r65974 10 9700 - 9717 r78056 26 9900 - 9917 r99590 13 2300 - 2313 r65975 12 9700 - 9717 r78057 2 9900 - 9917 r99590 13 2300 - 2315 r65976 13 9700 - 9717 r78058 23 9900 - 9917 r99590 13 2300 - 2317 r65978 48 9700 - 9717 r78059 1 9900 - 9917 r99590 13 2300 - 2319 r65978 47 9700 - 9719 r78059 30 9900 - 9919 r99590 13 2300 - 2321 r65979 47 9700 - 9717 r78060 2 9900 - 9917 r99590 13 2300 - 2323 r65979 46 9700 - 9719 r78060 9 9900 - 9917 r99590 13 2300 - 2325 r65980 33 9700 - 9717 r78061 6 9900 - 9917 r99590 13 2300 - 2325b r65980 33 9700 - 9719 r78061 23 9900 - 9917 r99590 10 2300 - 2327 r65981 45 9700 - 9717 r78062 1 9900 - 9917 r99590 13 2300 - 2327b r65981 49 9700 - 9719 r78063 1 9900 - 9917 r99590 13 2300 - 2327d r65982 32 9700 - 9719 r78063 7 9900 - 9917 r99590 10 2300 - 2329 r65983 12 9700 - 9719 r78063 28 9900 - 9919 r99590 13 2300 - 2329b r65984 13 9700 - 9719 r78063 7 9900 - 9921 r99590 13 2300 - 2329d r66302 15 3100 - 3105 r78063 12 9900 - 9921 r99590 10 2300 - 2331 r67092 14 3900 - 3903 r78064 27 9900 - 9917 r99590 13 2300 - 2331b r67989 7 1400 - 1402 r78064 34 9900 - 9919 r99590 10 2300 - 2333 r67989 7 1400 - 1403 r78066 10 9700 - 9724 r99590 21 2300 - 2333b r69045 4 4800 - 4803 r78068 11 9700 - 9724 r99590 13 2300 - 2333d r71228 6 2000 - 2005 r78069 12 9700 - 9724 r99590 10 2300 - 2335 r72328 6 1100 - 1101 r81276 10 4800 - 4803 r99590 13 2300 - 2335b r72328 6 6500 - 6501 r81277 10 4800 - 4803 r99590 10 2300 - 2339 r72328 6 6500 - 6502 r82459 2 5200 - 5203 r99590 10 2300 - 2341 r72328 6 6500 - 6503 r82459 13 5200 - 5205 r99590 10 2300 - 2343 r72328 6 6500 - 6504 r82459 13 5200 - 5207 r99590 10 2300 - 2345 r72328 6 6500 - 6505 r82459 13 5200 - 5209 r99590 10 2300 - 2347 r72328 6 6500 - 6506 r82459 1 5200 - 5210 r99590 10 2300 - 2349 r72328 6 6500 - 6507 r82459 2 9700 - 9703 r99590 10 2300 - 2351 r72328 6 6500 - 6508 r82459 13 9700 - 9705 r99693 4 3000 - 3005 r72328 6 6500 - 6509 r82459 13 9700 - 9707 r99693 4 3000 - 3009 powertech 12.5l 6125hf070 engine (waterloo) (esn 030000- ) pc2875 (17-dec-02) 9995-19 pn=675 p r o o f p r o o f powertech 12.5l 6125hf070 engine (waterloo) (esn 030000- ) numerical index - continued part no. grid key page part no. grid key page part no. grid key page r99695 1 3000 - 3005 t122803 10 3500 - 3503 t20217 8 2300 - 2339 r99695 1 3000 - 3009 t127156 1 3100 - 3105 t20217 8 2300 - 2341 r99699 13 3000 - 3005 t135241 5 9700 - 9715 t20217 8 2300 - 2343 r99700 13 3000 - 3009 t13814 23 9700 - 9721 t20217 8 2300 - 2345 r99702 11 3000 - 3005 t146102 5 3000 - 3001 t20217 8 2300 - 2347 r99702 11 3000 - 3009 t146102 5 3000 - 3006 t20217 8 2300 - 2349 ty16004 2 9900 - 9915 t146102 5 3000 - 3010 t20217 8 2300 - 2351 ty16005 3 9900 - 9915 t146102 5 3000 - 3012 t20900 6 7800 - 7803 ty16034 9900 - 9915 t146102 1 9900 - 9911 t20900 6 7800 - 7805 ty16035 9900 - 9915 t146104 9 3000 - 3001 t20900 6 7800 - 7807 ty16036 9900 - 9915 t146104 9 3000 - 3006 t20900 6 7800 - 7809 ty16037 9900 - 9915 t146104 8 3000 - 3010 t20900 6 7800 - 7811 ty16423 9900 - 9915 t146104 8 3000 - 3012 t20900 6 9700 - 9713 ty22007 2 9900 - 9912 t146104 3 9900 - 9911 t21937 16 4600 - 4603 ty22008 2 9900 - 9912 t146106 9 3000 - 3001 t24166 1 9900 - 9922 ty22010 2 9900 - 9912 t146106 9 3000 - 3006 t24167 9 9900 - 9922 ty22011 2 9900 - 9912 t146106 8 3000 - 3010 t27077 16 7800 - 7807 ty22041 9900 - 9912 t146106 8 3000 - 3012 t27077 13 9700 - 9713 ty22042 9900 - 9912 t146106 3 9900 - 9911 t27432 16 5200 - 5205 ty22064 1 9900 - 9912 t146515 9 3000 - 3001 t27432 10 5200 - 5207 ty22065 1 9900 - 9912 t146515 9 3000 - 3006 t27432 10 5200 - 5209 ty22066 1 9900 - 9912 t146515 8 3000 - 3010 t27432 10 9700 - 9705 ty22067 1 9900 - 9912 t146515 8 3000 - 3012 t27432 16 9700 - 9707 ty22068 1 9900 - 9912 t146515 3 9900 - 9911 t31636 24 5900 - 5903 ty22069 1 9900 - 9912 t146516 9 3000 - 3001 t31636 37 5900 - 5905 ty22070 1 9900 - 9912 t146516 9 3000 - 3006 t31636 39 5900 - 5907 ty22073 1 9900 - 9912 t146516 8 3000 - 3010 t35580 14 3700 - 3701 ty22074 1 9900 - 9912 t146516 8 3000 - 3012 t35580 42 9900 - 9909 ty22450 5 1100 - 1101 t146516 3 9900 - 9911 t35580 9900 - 9909 ty22450 2 2900 - 2901 t146517 9 3000 - 3001 t37796 21 7800 - 7803 ty22466 11 3900 - 3903 t146517 9 3000 - 3006 t37796 21 7800 - 7805 ty22467 4 1100 - 1101 t146517 8 3000 - 3010 t37796 1 7800 - 7807 ty22467 2 7800 - 7803 t146517 8 3000 - 3012 t37796 1 7800 - 7809 ty22467 2 7800 - 7805 t146517 3 9900 - 9911 t37796 1 7800 - 7811 ty22467 13 7800 - 7807 t153119 9 9700 - 9715 t37796 19 9700 - 9713 ty22467 13 7800 - 7809 t184592 1 2400 - 2435 t53268 12 9700 - 9713 ty22467 13 7800 - 7811 t19687 2 1900 - 1907 t70176 18 5200 - 5205 ty22467 2 9700 - 9713 t20217 7 2300 - 2303 t70176 9 5200 - 5207 ty22471 4 3000 - 3010 t20217 8 2300 - 2303b t70176 9 5200 - 5209 ty22471 4 3000 - 3012 t20217 12 2300 - 2303d t70176 22 7700 - 7703 ty22472 12 9700 - 9709 t20217 7 2300 - 2305 t70176 8 7800 - 7803 ty22473 13 9700 - 9709 t20217 8 2300 - 2305b t70176 8 7800 - 7805 ty24301 12 9700 - 9727 t20217 12 2300 - 2305d t70176 8 7800 - 7807 ty24304 3 9700 - 9727 t20217 7 2300 - 2307 t70176 8 7800 - 7809 ty24304 4 9700 - 9727 t20217 7 2300 - 2309 t70176 8 7800 - 7811 ty24304 5 9700 - 9727 t20217 7 2300 - 2311 t70176 9 9700 - 9705 ty24304 6 9700 - 9727 t20217 7 2300 - 2313 t70176 18 9700 - 9707 ty24311 9900 - 9915 t20217 7 2300 - 2315 t70176 8 9700 - 9713 ty6280 1 9900 - 9912 t20217 7 2300 - 2317 t70176 19 9900 - 9909 ty6364 1 9900 - 9912 t20217 7 2300 - 2319 t74492 13 1900 - 1907 ty6389 2 9900 - 9912 t20217 7 2300 - 2321 t74492 20 7700 - 7705 ty6390 2 9900 - 9912 t20217 7 2300 - 2323 t74492 20 7700 - 7713 ty6391 2 9900 - 9912 t20217 7 2300 - 2325 t74492 19 9900 - 9909 ty6392 2 9900 - 9912 t20217 7 2300 - 2325b t76054 1 9700 - 9734 ty6393 2 9900 - 9912 t20217 8 2300 - 2327 t76054 1 9700 - 9736 ty6394 2 9900 - 9912 t20217 7 2300 - 2327b t76054 1 9700 - 9737 ty6730 8 3000 - 3001 t20217 7 2300 - 2327d t76054 1 9700 - 9738 ty6746 8 3000 - 3006 t20217 8 2300 - 2329 t76938 2 5900 - 5905 t10745 4 3100 - 3105 t20217 7 2300 - 2329b t76938 28 5900 - 5907 t10745 9 3100 - 3105 t20217 7 2300 - 2329d t77613 17 3500 - 3503 t11081 52 9700 - 9717 t20217 8 2300 - 2331 t77613 11 3700 - 3701 t11081 52 9700 - 9719 t20217 7 2300 - 2331b t77613 2 9700 - 9725 t11370 16 3900 - 3903 t20217 8 2300 - 2333营口约翰迪尔柴油机RE55900凸轮轴价格行情,台北强鹿柴油发动机加大主轴瓦RE534181找哪家,上饶约翰迪尔甘蔗收割机发动机配件市场报价,内江约翰迪尔强鹿4045柴油机平衡轴铜套批发商,资阳JohnDeere摇臂室盖垫片R526607价格行情,辽源JohnDeere3029气门室盖垫片哪里买,莱芜约翰迪尔水泵总成RE500734哪里买,阿克苏强鹿柴油机连杆瓦诚信推荐,钦州强鹿柴油机水泵AR97708哪家买,specifications, then torque-turn all cap screws 90-100°. specification tongue-and-groove connecting rod cap screw—final torque 75 n?m (55 lb-ft) plus 90–100° turn clockwise . see torque-turn connecting rod cap screws, described next in this group. 14. on precision joint? connecting rods: initially, tighten cap screw closest to piston end to specifications. next, tighten the other cap screw. feel rod-to-cap joint to check for proper alignment. specification precision joint? connecting rod cap screw—torque 95 n?m (71 lb-ft) plus 90–100° turn clockwise precision joint is a trademark of deere & company ctm86 (20mar01) 02-030-42 powertech? 8.1 l diesel engines — base engine 032001 pn=192 continued on next page cylinder block, liners, pistons,&rods repair&adjustment 02 030 dpsg,ouo1004,886 –19–17may99–6/6 see torque-turn connecting rod cap screws, described next in this group. 43 rg,rg34710,1142 –19–23oct97–1/2 torque-turn connecting rod cap screws rg7047 –un–05dec97 tightening rod cap screws by torque-turn method a—parallel to centerline of crankshaft axis b—perpendicular to centerline of crankshaft axis using engine axis method to torque-turn connecting rod cap screws: 1. after tightening cap screws to torque values, mark connecting rod cap&socket. 2. position handle of wrench parallel to centerline of engine crankshaft axis (a). 3. tighten 1/4 turn (90–100°) clockwise until handle of wrench is perpendicular to centerline of engine crankshaft axis (b) as shown. continued on next page ctm86 (20mar01) 02-030-43 powertech? 8.1 l diesel engines — base engine 032001 pn=193 cylinder block, liners, pistons,&rods repair&adjustment 02 030 44 rg,rg34710,1142 –19–23oct97–2/2 rg5698 –un–05dec97 jt05993 torque angle gauge using jt05993 torque angle gauge to torque-turn connecting rod cap screws: after tightening cap screws to initial torque values provided earlier, follow directions provided with gauge and torque-turn each cap screw 90°–100°. rg,rg34710,1143 –19–23oct97–1/1 check engine rotation for excessive tightness 1. rotate crankshaft several revolutions to be sure engine rotates without excessive tightness. 2. check liners for deep scratches caused by an improperly installed/broken piston ring. 3. check side clearance of rods. must have slight side-to-side movement. ctm86 (20mar01) 02-030-44 powertech? 8.1 l diesel engines — base engine 032001 pn=194 cylinder block, liners, pistons,&rods repair&adjustment 02 030 45 rg,rg34710,1144 –19–03jan01–1/1 complete final assembly note: refer to the proper group for installation of components. 1. install camshaft,&timing gear cover. (group 050.) 2. install oiling system components. (group 060.) 3. install cylinder head using a new gasket&cap screws. install valve train components. (group 020 s.n. ( —199,999).) (group 021 s.n. (200,000— ).) 4. install fuel injection system components. (see group 090 in appropriate ctm for specific fuel system.) 5. install thermostat housing&coolant bypass pipe, if removed. (group 070.) 6. install vibration damper&crankshaft pulley. (group 040.) 7. install alternator. (group 100.) to install fan&fan belt, see machine technical manual. 8. install exhaust manifold&intake assembly. (group 080.) 9. install starting motor. (group 100.) 10. fill engine with clean oil&proper coolant. 11. install engine in vehicle (if removed). (see machine technical manual.) 12. perform engine break-in. (group 020 s.n. ( — 199,999).) (group 021 s.n. (200,000— ).) ctm86 (20mar01) 02-030-45 powertech? 8.1 l diesel engines — base engine 032001 pn=195 cylinder block, liners, pistons,&rods repair&adjustment 02 030 46 ctm86 (20mar01) 02-030-46 powertech? 8.1 l diesel engines — base engine 032001 pn=196 group 040 crankshaft, main bearings&flywheel repair&adjustment 02 040 1 rg,rg34710,1149 –19–23oct97–1/1 crankshaft&main bearing failure analysis scored main bearing: (diagnosis also applies to connecting rod bearing.) ? oil starvation. ? contaminated oil. ? engine parts failure. ? excessive heat. ? poor periodic service. galled/“wiped” bearings: ? fuel in lubricating oil (incomplete combustion). ? coolant in lubrication system (cracked block, liner seal failure,/leaking coolant pump seal with plugged hole). ? insufficient bearing oil clearance. ? parts not lubricated prior to engine operation. ? wrong bearing size. inconsistent wear pattern: ? misaligned/bent connecting rod. ? warped/bowed crankshaft. ? distorted cylinder block. broken main bearing caps: ? improper installation. ? dirt between bearing&crankshaft journal. ? low oil pressure. ? oil pump failure. cracked, chipped/broken bearings: ? overspeeding. ? excessive idling. ? lugging. ? excessive oil clearance. ? improper installation. ctm86 (20mar01) 02-040-1 powertech? 8.1 l diesel engines — base engine 032001 pn=197 crankshaft, main bearings&flywheel repair&adjustment 02 040 2 ctm8,gr15,18 –19–16feb95–1/1 crankshaft rear oil seal&wear sleeve general information rg5634 –un–02apr90 a—two piece seal&sleeve b—unitized seal&sleeve two types of oil seal&wear sleeve assemblies are used: ? earlier engine applications used a two-piece oil seal and wear sleeve assembly (a) that can easily be separated by hand. ? current production engines use a unitized (non-separable) oil seal&wear sleeve assembly (b). removal of the two oil seal&wear sleeve types are different; refer to the appropriate procedure when servicing rear crankshaft oil seal&wear sleeve assembly. the unitized (non-separable) oil seal assembly is the only type that is currently available through service parts. ctm86 (20mar01) 02-040-2 powertech? 8.1 l diesel engines — base engine 032001 pn=198 crankshaft, main bearings&flywheel repair&adjustment 02 040 3 rg,rg34710,1150 –19–23oct97–1/3 remove crankshaft rear oil seal&wear sleeve rg5819 –un–05dec97 drilling holes in rear oil seal casing rg6467 –un–05dec97 removing rear oil seal using jdg719 seal puller adapter along with jde38-2 shank&jde38-3 slide handle is the preferred method for removing the crankshaft rear oil seal. if jdg719, jde38-2,&jde38-3 are not available, jdg22 seal remover can be used to remove the seal. follow same procedure for both pullers. 1. remove rear drive hub (if equipped)&flywheel. see remove flywheel later in this group. 2. drill two small holes approximately 20° apart in bottom of seal casing. install sheet metal screws in seal casing with jdg22 seal remover attached. note: it may be necessary to drill a small hole in seal at one/two other locations to aid in removal. 3. cock seal at 6 o’clock position (180° opposite drilled hole) using a small punch&carefully pull seal from housing. continued on next page ctm86 (20mar01) 02-040-3 powertech? 8.1 l diesel engines — base engine 032001 pn=199 crankshaft, main bearings&flywheel repair&adjustment 02 040 4 rg,rg34710,1150 –19–23oct97–2/3 rg6468 –un–05dec97 removing crankshaft wear sleeve 4. assemble jdg790 rear wear sleeve puller and position onto crankshaft flange with wear sleeve seated in jaws. 5. securely tighten band clamp in groove on o.d. of jaws. 6. tighten forcing screw with disk centered in crankshaft flange until wear sleeve is removed from crankshaft. rg,rg34710,1150 –19–23oct97–3/3 rg5822 –un–05dec97 cleaning crankshaft flange clean o.d. of crankshaft flange with cleaning solvent, acetone,/any other suitable cleaner that will remove sealant. (brake kleen/ignition cleaner&drier are examples of commercially available solvents that will remove sealant from flange.) look for nicks/burrs on wear ring surface&bore in flywheel housing. if necessary, use a polishing cloth. finish cleaning by wiping flange with a clean rag. any small nicks should be removed with 180-grit/finer polishing cloth. check oil seal housing runout as explained later in this group. ctm86 (20mar01) 02-040-4 powertech? 8.1 l diesel engines — base engine 032001 pn=200 crankshaft, main bearings&flywheel repair&adjustment 02 040 5 rg,rg34710,1151 –19–17may99–1/1 crankshaft rear oil seal&wear sleeve handling precautions rg5640a –un–31oct97 rear oil seal&wear sleeve a—oil seal&wear sleeve use the following precautions for handling seal and wear sleeve: seal (a)&wear sleeve (b) are assembled. do not separate. if parts become separated, discard and replace with a new assembly. attempts to reassemble will cause the wear sleeve to damage the seal allowing engine oil to leak past seal. always install seal&wear sleeve assembly immediately after removal from plastic bag to avoid possible dirt contamination. no lubricant of any kind is to contact seal when installing. use of a lubricant may result in premature seal failure. install oil seal/wear sleeve assembly with the open side of seal&wear sleeve i.d. chamfer toward the engine. if seal is reversed, engine oil may be lost because grooves in oil seal lip would be incorrect with respect to direction of crankshaft rotation. oil seal/wear sleeve assembly must be installed with the jdg476(85) crankshaft rear oil seal installation tool set. tool set consists of jdg477 (85) pilot&jdg478 driver. ctm86 (20mar01) 02-040-5 powertech? 8.1 l diesel engines — base engine 032001 pn=201 crankshaft, main bearings&flywheel repair&adjustment 02 040 6 rg,rg34710,1152 –19–17may99–1/2 install crankshaft rear oil seal&wear sleeve rg4639 –un–05dec97 installing crankshaft rear oil seal/wear sleeve a—pilot b—allen head cap screws c—oil seal/wear sleeve assembly note: these instructions are for use when the oil seal housing&oil pan would not be removed. 1. for separable type seal: apply a light coating of loctite? 680 retaining compound,/equivalent, completely around the leading edge of crankshaft flange. wipe away any sealant that may have gotten on i.d. of seal housing bore. for unitized seal: apply a light coating of clean engine oil around rubber od of seal. 2. install jdg477 (85) pilot (a) on end of crankshaft using the allen head cap screws (b) supplied with tool set. tighten cap screws securely. important: handle seal&wear sleeve assembly carefully. if assembly becomes separated, discard these parts and install a new assembly. see crankshaft rear oil seal and wear sleeve handling precautions, earlier in this group. when installing the jdg478 driver on jdg477 (85) pilot&crankshaft flange to position oil seal/wear sleeve assembly, locate crossbar of installer at right angle (90°) to allen head cap screws. this allows the crossbar to bottom on pilot, not head of cap screws, assuring correct installation. note: unitized seal&wear sleeve assembly must be installed with wear sleeve flange away from engine. part number&stamped instructions should be readable when installed. 3. carefully start oil seal/wear sleeve assembly (c) over jdg477 (85) pilot&crankshaft with open side of seal toward engine. loctite is a registered trademark of loctite corp. ctm86 (20mar01) 02-040-6 powertech? 8.1 l diesel engines — base engine 032001 pn=202 continued on next page crankshaft, main bearings&flywheel repair&adjustment 02 040 7 rg,rg34710,1152 –19–17may99–2/2 rg4640 –un–05dec97 a—driver crankshaft rear oil seal/wear sleeve installed b—wear ring assembly 4. position jdg478 driver (a) so that hole in the cross plate goes over threaded stud of pilot. install washer and nut on stud. 5. tighten nut to draw jdg478 driver in until crossbar bottoms on jdg477 (58) pilot. when the tool bottoms, seal&wear ring assembly (b) will be correctly positioned. 6. remove jdg476 (85) tool set from engine. dpsg,ouoe003,28 –19–17dec98–1/2 inspect vibration damper 德州johndeere约翰迪尔强鹿柴油机水泵垫片多少钱,包头强鹿缸套阻水圈AR72351多少钱,德州约翰迪尔皮带R135193厂家供应,泰州约翰迪尔6081柴油机大修包代理商,绵阳约翰迪尔气门室盖垫片R524496哪家好,无堂划分域约翰迪尔柴油机气门座圈R501640批发,菏泽强鹿柴油发电机组单体泵诚信推荐,毕节JohnDeere垫圈厂家供应,新余强鹿柴油机柴滤RE533910公司,长治强鹿RE70960启动马达多少钱,泰州强鹿柴油机止推轴承RE65168公司,南充约翰迪尔传感器RE522794批发价,北京强鹿柴油机RE560752油冷却器哪家好,鹤岗约翰迪尔拖拉机发动机活塞环公司,铜陵约翰迪尔铰接自卸卡车柴油机配件批发价,哈尔滨JohnDeere节温器RE522076市场报价,天水约翰迪尔挖掘机启动马达价格,四平JohnDeere气门导管R106831厂家价格,rg7208 –un–28jul94 single damper rg7369 –un–05jan98 dual damper important: the damper assembly is not repairable and should be replaced every 5 years or 4500 hours, whichever occurs first. also, replace damper whenever crankshaft is replaced/major engine overhaul is performed. dual dampers should always be replaced as a matched set. do not immerse the vibration damper or the damper pulley in cleaning solvent. doing so may damage the rubber portions of this assembly. never apply thrust on outer ring of damper. damper is sensitive to impact damage, such as being dropped or struck with a hammer. 1. relieve tension/remove v-belts (shown removed). 2. grasp vibration damper with both hands&attempt to turn it in both directions. if rotation is felt, damper is defective&should be replaced. ctm86 (20mar01) 02-040-7 powertech? 8.1 l diesel engines — base engine 032001 pn=203 continued on next page crankshaft, main bearings&flywheel repair&adjustment 02 040 8 dpsg,ouoe003,28 –19–17dec98–2/2 rg7065 –un–26nov97 measuring runout of single damper rg7370 –un–05jan98 measuring runout of dual damper a—preloaded probe 3. check vibration damper radial runout by positioning a dial indicator so preloaded probe (a) contacts damper o.d. 4. rotate crankshaft using jde81-1/jdg820 flywheel turning tool. 5. note total dial indicator movement. compare reading with specification below. specification vibration damper—maximum radial runout . 1.02 mm (0.040 in.) if runout exceeds specifications, replace vibration damper. see remove crankshaft vibration damper later in this group. rg,rg34710,1153 –19–23oct97–1/1 check crankshaft end play rg5934 –un–28aug91 checking crankshaft end play 1. completely engage then release the clutch lever. 2. place a dial indicator on damper face. important: use care not to damage/distort the timing gear cover/bearing inserts when prying. do not pry on outer inertia ring of damper. 3. pry with flat bar between the damper pulley&timing gear cover. specification crankshaft—end play 0.038—0.380 mm (0.0015—0.0150 in.) . note: new thrust bearings will usually restore proper end play. ctm86 (20mar01) 02-040-8 powertech? 8.1 l diesel engines — base engine 032001 pn=204 crankshaft, main bearings&flywheel repair&adjustment 02 040 9 rg,rg34710,1154 –19–23oct97–1/2 remove crankshaft vibration damper rg6751 –un–26nov97 preparing to remove crankshaft vibration damper a—cap screw b—thread protector important: do not use a jaw-type puller to remove vibration damper. damage could result to the damper. never apply thrust on outer ring of damper. do not drop or hammer on damper. 1. remove pulley from damper, if equipped (shown removed). 2. remove cap screw (a)&washer securing damper to crankshaft. 3. install jdg787 thread protector (b) in nose of crankshaft. rg,rg34710,1154 –19–23oct97–2/2 rg7209 –un–26nov97 removing crankshaft vibration damper a—jdg721 hub puller caution: plan a safe handling procedure to avoid personal injury/damage to damper. 4. remove damper from crankshaft using jdg721 hub puller (a). note: d01207aa (otc518) puller set (not shown) may also be used to remove damper. 5. check crankshaft pulley id&crankshaft od for pulley. specification crankshaft pulley—id 47.594—47.630 mm (1.8738—1.8752 in.) . crankshaft—od for front pulley 47.650—47.676 mm (1.8759—1.8770 in.) ctm86 (20mar01) 02-040-9 powertech? 8.1 l diesel engines — base engine 032001 pn=205 crankshaft, main bearings&flywheel repair&adjustment 02 040 10 rg,rg34710,1155 –19–23oct97–1/5 remove crankshaft front oil seal&wear sleeve rg6471 –un–05dec97 center punching front oil seal casing important: whenever front oil seal is replaced, the wear sleeve must also be replaced. note: if timing gear cover is going to be removed from engine, remove front seal&wear sleeve after timing gear cover is removed. to remove front oil seal: 1. check oil seal&wear sleeve for wear, damage, or leakage. 2. center punch seal casing at 12 o’clock position. rg,rg34710,1155 –19–23oct97–2/5 rg6472 –un–05dec97 drilling hole in front oil seal casing 3. drill 3.175 mm (1/8 in.) hole in casing. rg,rg34710,1155 –19–23oct97–3/5 rg6473 –un–05dec97 removing front oil seal 4. using jdg719 seal puller along with jde38-2 shank, jde38-3 hammer,&metal screw, remove seal. 5. remove keyway from keyslot of crankshaft. ctm86 (20mar01) 02-040-10 powertech? 8.1 l diesel engines — base engine 032001 pn=206 continued on next page crankshaft, main bearings&flywheel repair&adjustment 02 040 11 rg,rg34710,1155 –19–23oct97–4/5 rg6753 –un–05dec97 assembling puller to remove front wear sleeve rg7728 –un–05dec97 installing puller to remove front wear sleeve a—centering screw b—hex end of puller to remove wear sleeve using jdg786: 1. start fully threaded centering screw (a) through hex head end of puller (b) from jdg786 front wear sleeve puller until head of screw is approximately 1/2 in. from hex on puller. 2. thread centering screw into nose of crankshaft until it bottoms. back screw out one full turn after it bottoms. 3. tighten puller until it is securely threaded onto wear sleeve. back centering screw out one full turn and tighten threaded puller onto wear sleeve again. 4. remove centering screw from nose of crankshaft and puller. rg,rg34710,1155 –19–23oct97–5/5 rg7729 –un–05dec97 removing front wear sleeve a—forcing screw 5. install partially threaded forcing screw (a) into puller and tighten until bottoms in nose of crankshaft. there in no thread engagement in crankshaft; just with puller. 6. continue to tighten forcing screw until puller&wear sleeve are free from crankshaft flange. 7. inspect crankshaft flange for nicks/burrs. clean up flange with a light file&emery cloth. 8. measure front oil seal bore runout in timing gear cover and compare to the following specifications. specification crankshaft front oil seal bore in timing gear cover—maximum radial runout . 0.254 mm (0.010 in.) maximum ctm86 (20mar01) 02-040-11 powertech? 8.1 l diesel engines — base engine 032001 pn=207 crankshaft, main bearings&flywheel repair&adjustment 02 040 12 rg,rg34710,1156 –19–23oct97–1/1 remove&install timing gear cover—engine installed in vehicle (8000 series tractors) 6081hrw engines on 8100, 8200, 8300,&8400 tractors are equipped with front frame/oil sump. refer to tm1575 (8100, 8200, 8300,&8400 tractors— repair) for access to front frame/oil sump-to-engine block cap screws. (for 8000t tracks tractors, refer to tm1621.) to remove timing gear cover: 1. remove viscous fan drive, drive housing, and coupler. (refer to tm1575.) 2. remove crankshaft vibration damper as detailed earlier in this group. 3. disconnect coolant piping&remove coolant pump cover with coolant bypass tube. remove and discard gaskets. 4. back out all front frame/oil sump-to-engine block cap screws 9.5 mm (3.8 in.). 5. disconnect engine speed sen*** connector from sen***. 6. remove injection pump drive gear cover. 7. slowly lift engine block assembly approximately 6.4 mm (0.25 in.) using safety approved lifting equipment. important: the timing gear cover must not be “dragged” horizontally while in contact with front frame/oil sump gasket. doing so may damage gasket sealing bead. 8. remove remaining cap screws&carefully remove timing gear cover with coolant pump. remove&discard timing gear cover gasket. 9. remove front oil seal from timing gear cover and discard seal. 10. remove front wear sleeve from crankshaft flange and discard sleeve. to install timing gear cover: 1. thoroughly clean all timing gear cover gasket surfaces&front oil seal bore. note: front wear sleeve can be installed with timing gear cover removed/installed. 2. install a new front wear sleeve on crankshaft flange. see install front wear sleeve later in this group. 3. install timing gear cover. see install timing gear cover later in this group. 4. install front oil seal. see install crankshaft front oil seal earlier in this group. 5. install vibration damper. see install vibration damper later in this group. 6. tighten front frame/oil sump cap screws. see tighten cap screws on front frame/oil sump in group 060/tm1575. 7. complete final assembly as outlined in tm1575. ctm86 (20mar01) 02-040-12 powertech? 8.1 l diesel engines — base engine 032001 pn=208 crankshaft, main bearings&flywheel repair&adjustment 02 040 13 rg,rg34710,1157 –19–23oct97–1/1 remove timing gear cover—engine removed rg7210 –un–26nov97 removing timing gear cover a—coolant pump cover b—injection pump drive gear cover c—sen*** 1. remove engine oil pan. remove engine oil pump assembly if crankshaft is to be removed. 2. disconnect engine speed sen*** connector (shown disconnected) from sen*** (c). 3. remove injection pump drive gear cover (b). 4. disconnect coolant piping&remove coolant pump cover (a) with coolant bypass tube. remove and discard gaskets. 5. remove front auxiliary drive assembly, if equipped. see remove, inspect&install crankshaft gear-driven auxiliary drive in group 050. 6. remove remaining cap screws&remove timing gear cover with coolant pump. remove&discard gasket. 7. remove front oil seal from timing gear cover and discard seal. 8. remove front wear sleeve from crankshaft flange and discard sleeve. ctm86 (20mar01) 02-040-13 powertech? 8.1 l diesel engines — base engine 032001 pn=209 crankshaft, main bearings&flywheel repair&adjustment 02 040 14 rg,rg34710,1158 –19–23oct97–1/1 inspect&measure flywheel 1. inspect the clutch contact face for scoring, overheating, or cracks. replace flywheel if defective. 2. examine flywheel ring gear for worn/broken teeth. replace ring gear if defective, as described later in this group. important: maintain constant end pressure on crankshaft to hold shaft against thrust bearing when measuring flywheel or housing face. 3. measure flywheel housing face run-out, flywheel face flatness,&pilot bearing bore concentricity, as outlined later in this group. resurface flywheel face or replace as required. rg,rg34710,1159 –19–23oct97–1/1 check flywheel housing face runout r22212 –un–14dec88 checking flywheel housing face runout 1. mount dial indicator on flywheel. set pointer to contact pto mounting surface on flywheel housing at right angles. pointer should not contact holes in flywheel housing. important: maintain constant end pressure on crankshaft to hold shaft against thrust bearing when measuring flywheel housing face runout. 2. rotate flywheel by turning crankshaft. read total dial indicator movement. specification flywheel housing face—runout 0.20 mm (0.008 in.) maximum variation . ctm86 (20mar01) 02-040-14 powertech? 8.1 l diesel engines — base engine 032001 pn=210 crankshaft, main bearings&flywheel repair&adjustment 02 040 15 rg,rg34710,1160 –19–23oct97–1/1 check flywheel face flatness r22213 –un–14dec88 1. mount dial indicator base on flywheel housing. position pointer to contact driving ring mounting surface. do not allow pointer to contact driving ring mounting holes. important: maintain constant end pressure on crankshaft to hold shaft against thrust bearing when measuring flywheel face runout. 2. rotate flywheel by turning crankshaft. read total dial indicator movement. resurface flywheel face or replace as required. specification flywheel face—flatness 0.23 mm (0.009 in.) maximum variation . flatness 0.013 mm (0.0005 in.) maximum variation per 25 mm (1.0 in.) of travel rg,rg34710,1161 –19–23oct97–1/1 check pilot bearing bore concentricity r22214 –un–14dec88 checking flywheel pilot bearing bore 1. mount dial indicator on flywheel housing face and position pointer to contact i.d. of pilot bearing bore in flywheel. 2. rotate flywheel by turning crankshaft. read total dial indicator movement. specification flywheel pilot bearing bore— concentricity 0.127 mm (0.005 in.) maximum variation . ctm86 (20mar01) 02-040-15 powertech? 8.1 l diesel engines — base engine 032001 pn=211 crankshaft, main bearings&flywheel repair&adjustment 02 040 16 rg,rg34710,1162 –19–10jun99–1/1 remove flywheel rg10213 –un–23jun99 removing flywheel a—cap screws caution: flywheel is heavy. plan a proper lifting procedure to avoid injury. note: sae 1 flywheel housings must be removed before flywheel can be removed from engine. see remove sae 1 flywheel housing, later in this group. 1. remove two flywheel attaching cap screws (a), and install two pilot studs in their place. 2. remove remaining cap screws, remove drive hub (if equipped),&carefully pull flywheel from crankshaft. 3. check condition of dowel pin in crankshaft rear flange. dowel pin must not be cracked/chipped. measure protrusion of dowel pin from face of flange. if dowel pin is damaged,/protrusion is not within specifications, replace dowel pin. note: when replacing dowel pin, crankshaft must be removed to prevent damage to crankshaft thrust bearings. specification crankshaft dowel pin—protrusion 13.5—14.5 mm (0.53—0.57 in.) from crankshaft rear flange rg,rg34710,1163 –19–23oct97–1/1 remove sae 1 flywheel housing caution: flywheel housing is heavy. plan a proper lifting procedure to avoid injury. 1. remove attaching cap screws. 2. remove flywheel housing. 3. inspect mounting holes in flywheel housing for thread damage. ctm86 (20mar01) 02-040-16 powertech? 8.1 l diesel engines — base engine 032001 pn=212 crankshaft, main bearings&flywheel repair&adjustment 02 040 17 rg,rg34710,1164 –19–23oct97–1/1 remove sae 2&3 flywheel housing rg10214 –un–23jun99 removing flywheel housing a—flywheel housing caution: flywheel housing (a) is heavy. plan a proper lifting procedure to avoid injury. note: the flywheel must be removed before removing sae 2/3 flywheel housings. see remove flywheel earlier in this group. 1. remove flywheel housing attaching cap screws. 2. remove flywheel housing. 3. inspect mounting holes in flywheel housing for thread damage. rg,rg34710,1165 –19–23oct97–1/1 replace flywheel ring gear t90596 –un–14oct88 removing flywheel ring gear rg3838 –un–14oct88 installing flywheel ring gear a—chamfered side caution: oil fumes/oil can ignite above 193°c (380°f). use a thermometer&do not exceed 182°c (360°f). do not allow a flame or heating element to be in direct contact with the oil. heat the oil in a well ventilated area. plan a safe handling procedure to avoid burns. 1. if ring gear is damaged, place the flywheel on a solid flat surface. 2. remove ring gear with a brass drift&hammer. important: if flame heat is used, be sure gear is heated uniformly around circumference. do not overheat. overheating may destroy original heat treatment of gear. see caution. 3. heat new ring gear to 148°c (300°f) using either heated oil, oven heat,/flame heat. 4. install ring gear against shoulder of flywheel so chamfered side (a) is on engine side of flywheel. ctm86 (20mar01) 02-040-17 powertech? 8.1 l diesel engines — base engine 032001 pn=213 crankshaft, main bearings&flywheel repair&adjustment 02 040 18 rg,rg34710,1166 –19–23oct97–1/1 remove&install rear oil seal housing—engine installed in vehicle (8000 series tractors) important: remove rear oil seal housing for replacement purposes only. it is not necessary to remove seal housing for rear seal&wear sleeve replacement. 6081hrw engines used in 8100, 8200, 8300 and 8400 tractors are equipped with front frame/oil sump. refer to tm1575 (8100, 8200, 8300,&8400 tractors—repair) for access to front frame/oil sump-to-engine block cap screws. (for 8000t tracks tractors, refer to tm1621.) to remove rear oil seal housing: note: refer to tm1575 for access to rear crankshaft seal housing area. 1. remove flywheel cover. 2. remove transmission input shaft coupler bolts and pry coupler rearward. note: use a set screw to separate damper from flywheel, if necessary. 3. remove torsional damper from flywheel. 4. remove flywheel from right side of tractor. 5. back out all front frame/oil sump-to-engine block cap screws 9.5 mm (0.38 in.). 6. slowly lift engine block assembly approximately 6.4 mm (0.25 in.) using safety approved lifting equipment. important: the rear oil seal housing must not be “dragged” horizontally while in contact with front frame/oil sump gasket. doing so may damage gasket sealing bead. 7. remove rear oil seal housing (a). 8. remove rear wear sleeve from crankshaft flange with jdg790 wear sleeve puller kit as detailed earlier in this group. clean flange with emery cloth. to install rear oil seal housing: 1. install rear oil seal housing&check runout. see install crankshaft rear oil seal housing&see check crankshaft rear oil seal housing runout, later in this group.) 2. carefully lower engine onto locating dowels of front frame/oil sump. 3. tighten front frame/oil sump cap screws. see tighten cap screws on front frame/oil sump in group 060/tm1575. 4. install a new rear oil seal&wear sleeve assembly. see install crankshaft rear oil seal&wear sleeve, later in this group.) 5. install flywheel. see install flywheel later in this group. 6. install torsional damper onto flywheel. (see tm1575.) 7. pull transmission input shaft coupler forward, install cap screws&tighten to specified torque. (see tm1575.) 8. install flywheel cover. (see tm1575.) 9. start engine&check for leaks. ctm86 (20mar01) 02-040-18 powertech? 8.1 l diesel engines — base engine 032001 pn=214 crankshaft, main bearings&flywheel repair&adjustment 02 040 19 rg,rg34710,1167 –19–10jun99–1/1 remove rear oil seal housing—engine removed rg10212 –un–23jun99 removing rear oil seal housing a—rear oil seal housing b—rear oil seal 1. remove flywheel. see remove flywheel in this group. 2. remove engine oil pan. see remove oil pan in group 060. 3. remove rear oil seal housing (a). important: whenever rear oil seal is replaced, also replace rear wear sleeve as a matched assembly. 4. rear oil seal (b) will come off with housing. use a small punch&hammer to remove oil seal from housing. discard seal. important: the preferred method of removing the rear wear sleeve is with jdg790 rear wear sleeve puller. if removing wear sleeve with a chisel, do not gouge crankshaft flange. nicks/burrs should be removed with a medium-grit stone. a polishing cloth (180-grit/finer) may also be used when a stone is not available. 5. remove rear wear sleeve from crankshaft flange. crankshaft rear wear sleeve can be removed using one of the following procedures. however, the preferred method is using jdg790 wear sleeve puller kit. ? use jdg790 wear sleeve puller to remove wear sleeve from crankshaft flange, as described earlier in this group. see remove crankshaft rear oil seal&wear sleeve in this group. ? use the ball side of a ballpeen hammer&tap wear sleeve across its width in a straight line (to deform and stretch sleeve). ? score the wear sleeve in several places around o.d. (but do not cut) with a blunt chisel. remove wear sleeve from crankshaft flange. clean flange with a light file&emery cloth. ctm86 (20mar01) 02-040-19 powertech? 8.1 l diesel engines — base engine 032001 pn=215 crankshaft, main bearings&flywheel repair&adjustment 02 040 20 rg,rg34710,1168 –19–10jun99–1/2 remove main bearing caps rg10216 –un–23jun99 checking torques before removing main bearing caps rg10217 –un–23jun99 installing main bearing cap puller rg10218 –un–23jun99 tightening main bearing cap puller a—main bearing caps b—puller c—tips d—cap screws important: before removing main bearing caps (a), check for proper torque on all main bearings. also, check each bearing cap to make sure they are numbered for reassembly on the same numbered main bearing bosses. keep matched main bearings with their respective main bearing cap for comparison with crankshaft journal (surface wear) from which removed. if arrows are stamped on main bearing caps, note direction arrows are pointing to aid in reassembly. note: when removing main bearings&caps, leave no. 1&7 main bearing caps installed until all of the connecting rod caps have been removed. 1. remove main bearing cap screws. 2. install jdg1069 puller (b) so that tips (c) of blind hole puller legs are below bearing cap half. 3. tighten hex of actuator pin securely while holding collet portion of puller leg with second wrench. 4. tighten both cap screws (d) on cross block finger tight. continued on next page ctm86 (20mar01) 02-040-20 powertech? 8.1 l diesel engines — base engine 032001 pn=216 crankshaft, main bearings&flywheel repair&adjustment 02 040 21 rg,rg34710,1168 –19–10jun99–2/2 rg10219 –un–23jun99 using slide hammer to loosen bearing cap rg10220 –un–18jun99 removing main bearing cap a—slide hammer 5. attach d01300aa slide hammer (a) to cross block, tighten nut securely. 6. remove main bearing cap by sliding up on hammer weight. 7. use plastigage? to measure journal-to-bearing oil clearance on each main bearing as they are removed. see check main bearing oil clearance later in this group. plastigage is a registered trademark of dana corp. ctm86 (20mar01) 02-040-21 powertech? 8.1 l diesel engines — base engine 032001 pn=217 crankshaft, main bearings&flywheel repair&adjustment 02 040 22 rg,rg34710,1169 –19–24jun99–1/1 check main bearing oil clearance rg10237 –un–24jun99 checking main bearing oil clearance the use of plastigage? will determine bearing-to-journal wear (oil clearance) but will not determine condition of the bearing/journal surfaces. 1. place a strip of plastigage? in the center of the main bearing cap (with insert) about three-fourths of the width of the bearing. 2. use oil (sae30) on plastigage? to prevent smearing. 3. install cap&tighten to specifications. specification main
 English
 Espaol
 Franais
 阿拉伯
阿拉伯 中文(简)
中文(简) Deutsch
 Italiano
 Português
 日本
日本 韩国
韩国 български
 hrvatski
 esky
esky Dansk
Dansk Nederlands
 suomi
suomi Ελληνικ
 印度
印度 norsk
norsk Polski
 Roman
Roman русский
 Svenska