卡特彼勒3512发动机调整
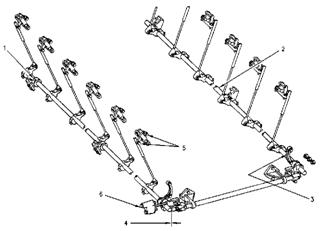
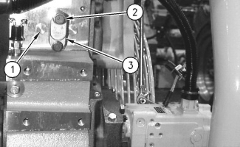
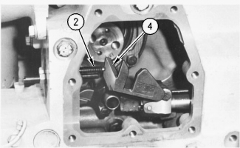
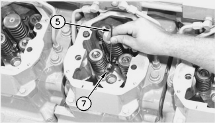
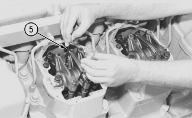
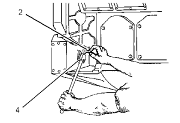
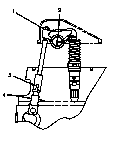
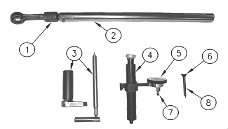
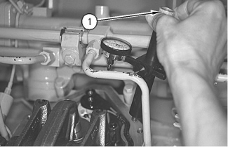
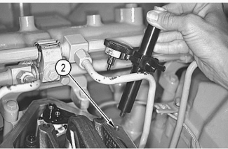
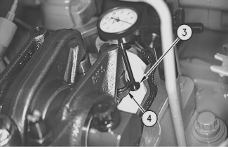
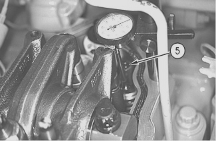
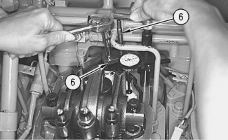
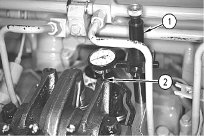
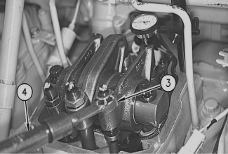
卡特彼勒3512发动机调整程序 1.单体泵齿条同步行程调整程序 2.寻找活塞在第1缸上止点 3.气门过桥调整程序 4.气门间隙调整程序 5.气门和气门桥调整工具 6.单体泵正时调整程序 卡特彼勒3512发动机设计 卡特彼勒3512E发动机技术规范 卡特彼勒3512 Crankshaft Position for Fuel Injector Adjustment and Valve Lash Setting卡特彼勒3512单体泵和气门阀调整顺序 Counterclockwise rotation –CCW. (Standard) from the flywheel end of the engine面向飞轮曲轴转动方向逆时针方向运转(标准运转) Inlet Valves 空气进气阀 Exhaust Valves 排气阀 Injectors 单体泵 No. 1 Piston At Top Center Position 活塞在第1缸上止点 1-3-6-7-10-12 1-4-5-6-9-12 2-4-5-8-9-11 No. 11 Piston At Top Center Position 活塞在第11缸上止点 2-4-5-8-9-11 2-3-7-8-10-11 1-3-6-7-10-12 Standard rotation CCW 标准逆时针方向运转点火顺序 1, 12, 9, 4, 5, 8, 11, 2, 3, 10, 7, 6 Inlet 进气阀调整 0.50 mm (0.020 inch) Exhaust 排气阀调整 1.00 mm (0.040 inch) 卡特彼勒单体泵连动杆装置 1. Bearing bore -bracket assemblies 轴承支架承孔 2. Rod assemblies 杆 3. Bearing bore - two support assemblies轴承2个支承架承孔 4. Front cross shaft and the side shafts 前端横轴和侧面轴 5. Bellcrank locknuts 曲柄杆防松螺母8 ± 2 N·m (70 ± 18 lb in) 6. Pin 销 10 ± 2 N·m (90 ± 18 lb in) 卡特彼勒单体泵齿条同步行程调整程序 Tools Needed 调整工具 8T-2684 Rack Synchronization Gauge 齿条同步行程测量工具 调整单体泵齿条同步行程是为了让所有的单体泵提供相同的供油量提供燃油给每个气缸. 单体泵齿条同步行程是调整每个单体泵齿条行程在相同的位置. 2. The top bolt that holds cover (3) in position is synchronization pin (2). Remove synchronization pin (2) and plug (1) from the front drive housing. Remove the washer from the synchronization pin. Remove the plug and install the synchronization pin into the threaded hole. Tighten the synchronization pin. 打开在前端驱动齿轮壳体左上侧的盖(3)松开同步销(2)和堵头(1) 取下同步销的铜垫片后把同步销(2)安装在堵头(1)的螺孔 3. Turn the governor or the actuator terminal shaft to the fuel ON position until the flat face of fuel stop lever (4) contacts synchronization pin (2). This is the synchronizing position or zero reference point. Hold the control linkage in this position when the injectors are adjusted. 把调速器或执行器终端轴推向油门“运行”的位置至到燃油停止供油操纵杆(4)的平面接触到同步销(2). 这就是同步位置或“0”的位置参考点. 保持控制杠在这位置当进行调整单体泵齿条同步行程. ( 1 )Plug 堵头 ( 2 ) Synchronization pin 同步销 ( 3 ) Cover 盖( 4 ) Fuel stop lever停止供应燃油杠 4. Remove the valve covers打开气门盖. 5. With the fuel stop lever against the synchronization pin, put the 8T-2684 Rack Synchronization Gauge (5) on the round part of the fuel injector rack between the fuel injector body and the end of the rack. Use a screwdriver and make an adjustment of control rod (6). Turn the screw that is located on the control rod one click at a time until the 8T-2684 Rack Synchronization Gauge fits between the fuel injector body and the shoulder at the end of the rack. Remove the screwdriver from the control rod so that no pressure remains on the linkage 燃油停止供油操纵杆的平面接触到同步销后, 把8T-2684 齿条同步测量工具(5)安装在单体泵和齿条尾端之间的单体泵齿条圆形部位上. 然后用螺丝起子调整控制杆(6)内的调整螺丝. 注意同时细听调整螺丝发出的“滴”声至到8T-2684 齿条同步测量工具接适当的接触到单体泵和齿条尾端扛之间.把螺丝起子从调整控制杠取开, 避免给齿条连杆机构造成压力 (5) 8T-2684Rack Synchronization Gauge齿条同步测量工具 (6) Control rod 控制杠 (7) Fuel injector rack 单体泵齿条 5. Check the setting with the rack synchronization gauge. Any pressure on the linkage with the screwdriver will not give a correct indication when the setting is checked with the rack Synchronization gauge. Ensure that the linkage is free and that the linkage is giving an accurate setting by moving the linkage. Check the setting again.Put the box end of a combination wrench over the nut and the bolt.The nut and the bolt connect control rod (6)and the bellcrank. Pull upward on the control rod three times. Check the setting again. 再检查8T-2684 齿条同步测量工具, 当再度用齿条同步测量工具检查调整设置时, 如使用在螺丝起子过度的力量在齿条连杆机构上将会造成错误的设置.确保齿条连杆机构是松动无阻力当移动连杆机构时能给予准确的设置. 用扳手套在曲柄杆, 然后把调整控制杆(6)往上拉3次,再检查设置是否准确. 6. If the other injectors need to be adjusted, use rack synchronizationgauge (5). When all adjustments have been made, release theactuator terminal shaft. 接下来以同样程序调整其他单体泵齿条同步行程(5), 调整完毕把调速器或执行器终端轴松开. 寻找卡特彼勒活塞在第1缸上止点 把正时螺丝(2)塞进飞轮壳的正时孔,用9S-9082盘车工具(4)和扭力扳手根据机组曲轴转动方向-逆时针方向(标准运转)盘转至到正时螺丝(2)刚好能接触和用手轻轻的扭进飞轮螺纹孔内. 1. Cover 盖 2. Timing bolt 正时螺丝 3. Plug 堵头 4. 9S-9082 Engine Turning Tool盘车工具 3. f the flywheel is turned beyond the point of engagement, the flywheel must be turned in the direction that is opposite of normal engine rotation. Turn the flywheel by approximately 30 degrees. Then turn the flywheel in the direction of normal engine rotation until the timing bolt engages with the threaded hole. This procedure will remove the play from the gears when the No. 1 piston is on the top center. 如盘过活塞在第1缸压缩行程上止点时, 必须将飞轮往顺时针方向盘大概30° 度. 然后再往逆时针方向(标准运转)盘转至到正时螺丝(2)刚好能接触和轻轻的扭进飞轮螺纹孔内. 这是为了消除耻轮之间的间隙避免造成不准确的第1缸的活塞上止点. 4. Remove the valve cover for the No. 1 and No. 11 cylinder head.打开第1气缸和第11缸的气门盖 此时第1气缸的进气和排气气门是完全闭合. 而用手可以摇动进气和排气气门的摇臂. 然后根据3512气门阀调整顺序调第1缸的气门. 如果气门的摇臂用手无法.摇移动或有点打开. 那就检查是否第11气缸是在压缩行程的上止点. 如果是那就根据3512气门阀调整顺序调整第11缸的气门. Locknut ( 1 ) 防松螺母70 ± 15 N·m (50 ± 11 lb ft) Valve Lash and Valve Bridge Adjustment卡特彼勒气门和气门桥调整工具 序号 Tools Needed 工具 数量 1 147-2060 Wrench 扳手 1 2 147-2059 Torque Wrench 扭力扳手 1 3 148-7211 Bridge Nut Socket 气门桥螺母套筒 1 4 145-5191 Gauge Support 千分表支架 1 5 147-2056 Dial Indicator (English) 千分表 ( 英制 ) 1 6 147-5536 Indicator Contact Point 千分表接触端 1 7 147-2057 Indicator Contact Point 千分表接触端 1 8 147-2058 Indicator Extension 千分表加长杆 1 9 147-5537 Dial Indicator ( Metric ) 千分表( 公制 ) 1 Valve Bridge Adjustment卡特彼勒气门过桥调整程序 Valve Bridge Adjustment: 气门过桥调整Note: can be used with the 147-5482 Valve Lash Gauge Group 备注: 也可用147-5482气间隙测量组 • When the 147-5482 Valve Lash Gauge Group is used, it is not necessary for you to remove the rocker arm shaft assemblies. The valves must be fully closed when the adjustment is made. 当使用147-5482气门间隙测量组时,不需要拆卸摇臂轴总成. 但气缸的进气和排气气门必须是完全闭合. 2. Assemble the 147-2058 Indicator Extension and the 147-5536 Indicator Contact Point on the 147-2056 Dial Indicator or on the 147-5537 Dial Indicator . 把147-2058千分表加长杆和147-5536千分表接触端安装在147-2056或147-5537的千分表上. 安装145-5191千分表支架在气门盖底端的螺丝孔(2). 调整在气门过桥( 4 )上端的接触表面( 3 ). 4. Loosen the locknut for the adjustment screw. Loosen the adjustment screw (5) by several turns.松开调整螺丝(5)的防松螺母数圈. 5. Apply a force of 5 N (1 lb) to 45 N (10 lb). Push down on the top contact surface of the valve bridge. Zero the indicator.稍微用力把气门过桥( 4 )轻轻按下至到贴住气门过桥的表面. 然后把千分表调至“0”位置. Note: Adjust the valve bridges before you make the valve lash adjustments.备注: 调整气门间隙之前必须先调气门过桥. Valve Lash Adjustment Specification卡特彼勒气门间隙调整规格 Valve Lash Check: Engine Stopped 调整气门间隙 Valves 气门 Acceptable Valve Lash Range 调整气门间隙范围 Inlet 进气 0.42 to 0.58 mm (0.017 to 0.023 inch) Outlet 排气 0.92 to 1.08 mm (0.036 to 0.043 inch) Valve Lash Adjustment卡特彼勒气门间隙调整程序 Ensure that the number 1 piston is at the top center position. 卡特彼勒调整气门间隙之前必须确保活塞在第1缸压缩行程上止点时 1. Install the 145-5191 Gauge Support (1). Use the 147-2056 Dial Indicator or use the 147-5537 Dial Indicator. Use the 147-2057 Indicator Contact Point (2). Install the tool in the rear bolt hole. The rear bolt hole is located on the valve cover base. 将147-2056或147-5537千分表和147-2057千分表接触端( 2 )装在145-5191千分表支架( 1 )后成套装置安装在气门盖底端的螺丝孔. 摇动摇臂上下数次把机油膜层排除以便能将千分表准确的调整在“0”设置. 将147-2060扳手( 3 )和147-2059扭力扳手( 4 )套在摇臂的防松螺母上, 然后稍微轻轻的把扳手往上提.以便能将千分表准确的调整在“0”设置. 避免扭力扳手受到任何压力. 4. Loosen the locknut. The locknut is located on the adjustment screw of the pushrod. Turn the adjustment screw until the valve lash is set to specifications. Tighten the nut for the adjustment screw to 70 ± 15 N·m (50 ± 11 lb ft ). The 147-2059 Torque Wrench is preset to the torque that is required. Check the adjustment again. 松开摇臂上的防松螺母, 旋转调整螺丝至到气门间隙达到额定的参数. 用147-2059扭力扳手扭紧摇臂上的防松螺母70 ± 15 N·m (50 ± 11 lb ft ). 然后再检查一次气门间隙. 如有差距再重新调整. Fuel Injector Timing Tool卡特彼勒单体泵正时调整工具 Description 工具名称 数量 1U-8869 Dial Indicator 千分表 1 9U-5233 Magnetic Fixture Group 磁性固定装置 1 9U-5138 Setting Gauge - 87.00 mm 定位表 1 5P-4160 Indicator Contact Point 千分表接触端 1 9S-9082 Engine Turning Tool 盘车工具 1 Fuel Injector Timing Tool卡特彼勒单体泵正时调整工具 1. The digital dial indicator needs to be programmed to read actual timing dimensions. Since the 9U-5138 Setting Gauge in the timing and fuel setting tool group is 87.00 mm, set the digital dial indicator for 87.00 mm. Use the following steps in order to program the indicator to read 87.00 mm. 3500A系列9U-5138 定位表设计的高度为87.00 mm, 所以必须按照以下的程序将数字式的千分表编程87.00 mm. 千分表屏幕显示负级“–”级在相反的参数, .如果千分表显示屏幕空白无显示推动“+/-”按钮, 屏幕就会显示“–”负级符号. 同时也能观察千分表内的滑杆的行程显示. 当千分表的滑杆行程超出千分表行程的范围.千分表显示屏幕显示正数移动. 推动预设按钮保持向下位置至到右上端出现“P”在闪亮, 然后松开按钮. 推动预设按钮保持向下位置至到右上端在闪亮的“P”消失, 显示屏的左下端会出现闪亮屏. 然后松开按钮. 用预设按钮以便使显示屏的左下端空白无任何显示. 按住预设按钮保持向下位置至到闪光显示屏开始闪亮在第1个号码位置. 第1个号码位置是位于第4个位置靠左小数. 然后松开按钮. 瞬间的按住预设按钮会倒至显示屏幕的参数变动. 按住预设按钮至到千分表位于“0”位置. 按住预设按钮使闪光显示屏幕移动和变换号码至到千分表屏幕显示87.00 mm位置, 按住预设按钮至到显示屏的右上端出现闪亮“P”, 然后松开按钮. 瞬间按住预设按钮显示至到87.00mm左边的“P”和“0”消失. Fuel Injector Timing卡特彼勒单体泵正时调整程序 单体泵正时高度的参数必须根据该要调整的发动机组 第2缸前在缸体上发动机名牌 Fuel Timing Spec参数来调整 1. Install a 5P-4160 Indicator Contact Point in the indicator stem安装5P-4160千分表接触端在千分表杆. 2. Install the indicator into the 9U-5233 Magnetic Fixture Group (2). Leave the collet loose.安装千分表在9U-5233磁性固定装置( 2 ), 让套筒夹松开. 3. Place the fixture and the indicator on the 9U-5138 Setting Gauge (3) with the extension rod of the bracket on the step of the gauge. Position the indicator in the bracket so that the indicator plunger can travel adequately. Tighten the collet.将固定装置装上加长接杆摆放在9U-5138定位表(3)而千分表的滑杆必须有充分的行程滑行, 然后将套筒夹扭紧. 4. Momentarily push the preset button on the digital dial indicator in order to stop the "P" in the upper right hand corner from flashing. The display should show 87.00 mm. Place the 1U-8869 Dial Indicator and the 9U-5233 Magnetic Fixture Group in the correct position on the injector. Make sure that the magnetic base of the timing fixture is on the top surface of injector follower (4) and that the extension rod is on the top surface of shoulder on fuel injector body (5) . 瞬间按住预设按钮以便停止数字式千分表上的“P”在千分表右上角闪动. 此时显示屏幕会显示87.00 mm. 将1U-8869千分表和9U-5233磁性固定装置摆放在单体泵上正确的位置. 确保磁性底座的磁性固定装置放在单体泵上的推杆上(4)而加长杆坐在单体泵的杠(5)上端平面. 5. The digital dial indicator should now read the actual fuel timing dimension of the injector that is being checked. 数字式千分表将显示实际调整/检查单体泵正时的高度参数. 6. If the dial indicator does not read the correct fuel timing dimension or the desired fuel timing dimension,如果千分表显示调整后单体泵正时的错误或非所需要的高度参数. 7. Ensure that the 1U-8869 Dial Indicator and the 9U-5233 Magnetic Fixture Group are in the correct position on the injector. Loosen the locknut for the pushrod adjustment screw.再检查1U-8869千分表和9U-5233磁性固定装置是否摆放在单体泵正确的位置. 再松开摇臂的防松螺母. 8. Turn the adjustment screw until the desired fuel timing dimension is read on the digital dial indicator. 旋转调整螺丝至1U-8869数字式千分表显示准确所需要单体泵正时的高度参数. Note: Turning the adjustment screw clockwise will lower the fuel timing dimension. Turning the adjustment screw counterclockwise will increase the fuel timing dimension. 备注: 顺时针旋转调整螺丝是减低单体泵正时的高度参数. 逆时针旋转调整螺丝是增加单体泵正时的高度参数. 8. Tighten the adjustment screw locknut to a torque of 70 ± 15 N·m (50 ± 11 lb ft) and check adjustment again. If necessary, repeat the procedure until the adjustment is correct. 调整单体泵正时完毕后. 扭紧摇臂上的防松螺母70 ± 15 N·m (50 ± 11 lb ft) 后再检查单体泵正时的高度参数是否有没有变动. 如有再重复以上的程序再重新调整. 9. Remove the timing bolt from the flywheel when the fuel timing check is completed. 调整单体泵正时完毕. 取下飞轮壳活塞上止点正时的定位螺丝. 10. Turn the flywheel by 360 degrees in the direction of normal engine rotation. Install the timing bolt for the flywheel. Repeat the procedure for the other half of the engine. 再用扭力扳手根据机组曲轴转动方向-逆时针方向(标准运转)盘转360° 度至到正时螺丝(2)刚好能接触和能用手轻轻的扭进飞轮螺纹孔内. 再重复以上的程序调整. Note: Remember to remove the timing bolt from the flywheel when the fuel timing check is completed. 当调整单体泵正时完毕. 记得取下飞轮壳活塞上止点正时的定位螺丝. 11. Install cover and plug from the right front side of the flywheel housing. 盖上飞轮壳右前端的盖和扭上堵头.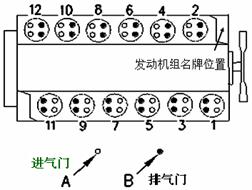
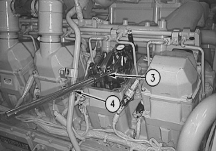

 1U-8869 Dial Indicator测量表

400-100-8969 15088860848
0574-26871589 15267810868
0574-26886646 15706865167
0574-26871569 18658287286


 English
 Espaol
 Franais
 阿拉伯
阿拉伯 中文(简)
中文(简) Deutsch
 Italiano
 Português
 日本
日本 韩国
韩国 български
 hrvatski
 esky
esky Dansk
Dansk Nederlands
 suomi
suomi Ελληνικ
 印度
印度 norsk
norsk Polski
 Roman
Roman русский
 Svenska